Saturday 17 December 2011

Real Turkish Delight

Now, I'm going to write rather passionately here about this subject.


I cannot believe some peoples perceptions of what Turkish Delight is. What a disgrace!


Over the last couple of weeks, I have poured over many on-line Turkish Delight recipes, and it is astounding how terrible some are!


However, finally I found a good one, which I could use as a base for mine.


Basic misconceptions of Traditional Turkish Delight:
It does not traditionally contain gelatine, or cream of tartare.


I've had a few cracks at this and, quite frankly, if you would like a a gelatinous sweet, or a clumsily sweetened version with a smell and texture that rivals playdough, go right ahead and use recipes that include those ingredients. I wouldn't touch the stuff.


Turkish Delight

Turkish delight is chewy, sweet, and has a depth of flavour. Hints of toffee, musk, rose, and lemon. Depending on what flavour you wish to have dominate your palette, you use more of one or the other.


I'm just going to concentrate on rose.


1kg caster sugar
1 1/2 cups water, plus 11/2 cups extra
150g cornflour (I find this works best with wheaten cornflour
2 tblsp lemon juice
2 tblsp rose water
1/2 tsp mastic gum beads ground with a mortar and pestle
1 tsp red food colouring
1/2 cup of pistachios or almonds
vegetable oil for greasing, but not Canola Oil


You will need a sugar thermometer for this.


In a medium saucepan place sugar, 1 1/2 cups of water, and lemon juice on medium heat, and stir until it is all dissolved. Scrape down the sides of the saucepan with a damp pastry brush to avoid crystals forming. 


Bring to a gentle boil and simmer until your thermometer registers 115-120C. If you have one of those wonderful thermometers that tells you what stage the sugar is at, boil until it reaches the soft ball stage.


Turn off the heat, and in a small saucepan mix the cornflour and remaining water on low heat. 


DO NOT WALK AWAY!


This will thicken really fast, so keep stirring to avoid any lumps. Use a whisk if you like.


Once it starts to thicken take it off the heat and keep stirrring, it will thicken right up until it's a potato mash texture. Ie you should be able to stick your finger in it and leave an indentation.

Add this to your sugar syrup and stir until it all the cornflour mixture dissolves. This can take a while. To make it easier, transfer cornflour mixture in small table spoon lumps so you don't have to break it up in the larger saucepan. It dissolves a bit faster this way.


If you a really careful you could mix it with one of those hand held wizz sticks, but try not to damage your saucepan!


Place the mixture back on a medium-low heat and let it boil, stirring occasionally. Keep it on the heat until it goes a nice golden colour.


To check if the mix will set, drop 1/2 a teaspoon of mixture into a cold glass of water. Leave it for a moment, fish it out and taste. It should be a bit chewy. If it dissolves in your mouth, keep the mix on the heat.


Once it gets to that chewy stage take it off the heat and stir in the mastic gum, rose water, food colouring, and nuts if you choose to.


Pour into a greased square 22x22cm pan. I use a Pyrex square baking dish. 
mastic beads have a musky flavour


Set aside and let it set over night.


Sift the remaining cornflour and icing sugar into a bowl, and sprinkle a board with a decent covering of the mixture.

Oil a spatula use it to turn the turkish delight out onto the chopping board. This will take a bit of muscle but having greased the pan or dish, it should make it easier. Just letting you know, there will be some pulling.


It will be quite elastic so don't be precious, once you get it on the board, just pull it back into shape.


Sprinkle more icing mixture on top and cut into 2cm sqaures and dunk into the icing sugar mixture to cover it well.


This will keep for weeks in a container or box which will allow air to flow through. Separate layers with grease proof paper with plenty of icing sugar mixture on top.


Notes:


Mastic beads gives the recipe a slight musky flavour, and also helps a little to bind the candy. I mainly use it to flavour, as in most mediterranean sweet recipes. You can pick up musk beads from any good continental food shop. If you can't get a hold of it, it's OK, just use musk flavouring or omit it. The recipe will still work without it.


There are a lot of forums concerning weeping turkish delight. This recipe will not weep if you follow it well. Reasons for weeping can be that it wasn't left to boil away for long enough, too much water in the recipe, or in my experience, using a bad recipe which includes cream of tartare!


Another cause for weeping is setting Turkish Delight in the fridge. Do not do this!


Enjoy!

Sunday 25 September 2011

A fraction of a Lebanese table.

A little Lebanese table, and no, potato wedges are not traditonal!
I love taking traditional recipes and giving them a bit of a twist. I'm always challenging things mum makes which are steeped in tradition. My twists are generally met with the reply, 'no, you can't do that'.

But you can!

And Mum let this one through to goal.

Kibbeh is traditionally made with beef, or vegetables. I made it with chicken this time.
It's served as a side along with many other meats and salads on your typically massive Lebanese table, or as part of a mezza table. Especially during Christian and Muslim festival times.

As you have noticed when it comes to Lebanese hospitality it's not about filling plates, it's about filling the entire table with different varieties of food. And every good Lebanese woman knows how to do this.
They spend days preparing for a day of feasting when the entire extended family comes around. 

While this is only a fraction of what makes it onto the table in a Lebo situation, it's a good fraction. In an Aussie situation they're always a hit at cocktail parties if you have a plate going around, or as a main with a side of salad. And I don't think I have come across a child that hasn't loved them.

How can you not like them? It's like the Lebo equivalent of an Aussie meat pie! And everyone loves those!

Chicken, Spinach, and Pine Nut Kibbeh
Outer shell mix

The shell:
100g fine burghul soaked for 2 hours
1 medium brown onion
1/2 tsp salt
1/2 tsp ground coriander
1/2 tsp ground cummin
1/2 tsp all spice
1/2 tsp ground cinnamon
a small handful parsley finely chopped
1/4 tsp freshly ground black pepper
350g chicken mince
3 tblsp plain flour (if needed)

 The filling:
The filling
a dollop of olive oil
20g pine nuts
1 medium brown onion finely chopped
a small handful of fresh sage finely chopped
200g chicken mince
125g chopped spinach
1/2 tsp salt
1/2 tsp ground white pepper
 1 tsp freshly chopped or dried oregano


In a food processor combine all the ingredients and process until well combined. Add the chicken mince and give it a few blasts until its all mixed in well. Then place in a bowl and cover. Refrigerate for 30 mins.

Like dough, it is easier to make the outer shell when the mix is cool.

If you don't have a food processor, don't worry. Just use your hands and chop the onion as finely as you can. It will just mean that your kibbeh won't have a smooth outer shell. If you're OK with that, then go for it. It still looks good, and the flavour isn't compromised at all.

While the outer shell mix is chilling, prepare the filling.
Heat oil in a fry pan, once hot add the pine nuts and stir them in the pan until they get a gold tinge. This won't take long so keep an eye, when they start to change colour remove from the pan, otherwise they burn.
Put the pan back on the heat, add a bit more oil if needed and add the onion. Cook until soft, add the sage and fry until fragrant.
Add the chicken, salt and white pepper, and cook until juices run clear. Don't over cook it otherwise the chicken will dry out in the oven.
Stir through the spinach and pine nuts and set aside.

Remove the outer shell mix from the fridge and mix with your hands, if it feels too moist mix through a couple of table spoons of plain flour at a time until the mix feels a bit firmer and not so sticky.

This is when it gets very handy:

1. Moulded hollow shell
2. Rotate filled shell closing the end as you go


3. Tornado!
1. Fill a little bowl of water, and moisten your hands with the water. Take a heaped tablespoon of the outer shell mix and roll into a ball in the palm of your hand. With your index and middle fingers, make an indentation in the middle of the ball. Keep pressing towards the outer walls of the ball until you get a hollow shell.

2. Fill the shell with a table spoon of the filling and turn the filled shell around the palm of your hand while closing the opening until it's a small hole. Finally bring it together with your fingers and close the hole. 

3. Continue shaping the kibbeh until it is a cute little tornado shape and place onto a lined baking tray.

If you think the shell can take more filling, by all means add more. No one likes an empty kibbeh!

You will not get this right the first time, trust me, but you will get better and better as you go along.

Moisten your hands once again and continue making the kibbeh. This recipe will make about 20 palm sized tornadoes. But it's up to you if you want to make them bigger or smaller.
They're great for an entree if you make them little, and kids just adore them.

Many tornadoes!
Once they're all made brush each one with a bit of oil and bake in a preheated oven at 180C fan forced for 20 minutes, or deep fry them until they a lovely golden colour on the outside.

Serve as a side, entree or as a main with salad such as tabouli. (I'll have to post the recipe for this later!)

NB: If you have fresh meat you can make a big batch and freeze them before baking. Lay them flat in the freezer and don't stack them. That's what my mum does. Then when you want them lay flat to defrost and follow the same baking instructions once thawed.


Sunday 18 September 2011

A light treat for a Spring day

It's Spring time and oranges are just beautiful, I've been eating them by the kilo! Here is a seasonal dessert I whipped up when a friend came over for lunch. You can incorporate this into your lunch or dinner menu during Spring or Summer quite easily.
It is an adapted recipe from bestrecipes.com.au, so if you want the original just google the website and orange souffle.

Just a thing about souffles. Don't be scared away by the whipping. I know they're best served straight out of the oven. But they do last about an hour or so before they completely deflate, and even then they still look OK.

If you prep everything before your guests arrive you can also pick up where you left off with relative ease without getting trapped in the kitchen.
You can actually re-whip egg whites, it's not that bad.

Orange, Cardamon and vanilla bean souffle
Serves 4

Juice from 4 oranges or about 1 cup orange juice
1/2 an orange worth of zest
100g sugar (caster, raw, brown white it's going to dissolve anyway)
1/4 tsp ground cardamon
1 vanilla pod
3 eggs seperated

Preheat your oven to 180C or 170C fan forced.


Cut 1/4 from the top of each orange and squeeze out the juice. Scoop out remaining pulp and set to the side, these shells will become your 'ramekins'.
Run the juice through a sieve and discard the pulp. 
Zest two of the tops of the oranges or all four if you want it extra zingy.
Pour juice and zest into a small saucepan with 50 g sugar (about 4 slightly heaped tablespoons), ground cardamon, and add your vanilla pod. Bring to the boil stirring gently until sugar dissolves.
Simmer for a few minutes on low or until you get a nice vanilla aroma. Remove the vanilla pod, give it a splash of cold water and set aside to dry for reuse.

Give the seperated yolks a bit of a whisk.

Egg yolk mix should look like this once thickened
Then get your double boiler thing happening. (a pot of boiling hot water on the stove with a bowl on top, don't let the water touch the bowl)
On medium heat pour the sugar and juice mix into the bowl and slowly pour in the egg yolks while whisking. If the yolks start to separate take the double boiler off the heat and whisk until smooth. But this shouldn't happen.

Keep whisking until it thickens. Take off the heat and leave to cool.
You can use a spoon, but I like whisks because you don't get any lumps. I use a whisk with bechamel sauce too.

You can do this part a day in advance if you like. If you're in a hurry spread it evenly over a big plate to cool down faster.

Whisk the eggs until soft peaks form and slowly add the other 50g sugar. Whisk until sugar has dissolved.

You can do this before your guests arrive, and then when it's time for dessert just give it another quick whisk to get air back into it.

Gently fold in your egg yolk mixture into the fluffy egg whites and pour into the orange shells or greased ramekins leaving about 5mm from the top.
Bake in a preheated oven for about 15 minutes or until gold on top.
Garnish with mint and serve with whipped cream.

Note: this is a very light gluten free dessert, but if you want to add a bit of fat add 40g butter (melted) and two table spoons of plain flour, almond or hazelnut meal to the sugar and juice mix before adding the egg yolks.

Sunday 11 September 2011

I'm back

After a over a month away I'm back on the blog. I've been moving house and fixing up furniture for the last month or so. 
I'm just exhausted!
Anyway so I'm in Melbourne, and I am having an absolute ball! There are so many places to check out here, I'm kind of going through food over load!
I've been getting into bread since arriving, not the flat type but the traditional loaf style.
I'm a bit sick of the whole contintental thing at the moment and have been really enjoying your average traditional loaf.
It seems to be making a bit of a come back too. Everyone went all exotic and now they want to go home!

Olive and herb bread.

So this is what I made the other day. I know what you're saying, 'another olive bread?' But this is different. It's a traditional take on it, and the bread base gave me a great texture. 

I'm blogging this recipe because I think it's adaptable to any flavour you like. You could make a banana or raisin bread as a sweet version, for example. Or something savoury, like a linseed or pumpkin bread. 
The skie's the limit!


I'm into working out a rule of thumb for things, as I'm not much of a recipe follower. I get bored, and sometimes I just want to use something up instead of throwing it out.
And we shouldn't throw it out. It's wasteful, ungrateful and completely unnecessary. We live with enough excess.

My policy on excess food is this: share it, freeze it, or turn into something else. 
It's not hard.
Ok, that's enough of a moral bashing when it comes to waste. This isn't what I'm about here. I'm guilty too, if not food then on other things.

I have so many shoes, for example. Do I need them? No!
I love shoes.
It's probably the only thing I would trade a meal for. That's terrible isn't it?  Oh well, that's me. Guilty.

Traditional Olive and Herb Bread

3 cups sifted plain flour
1 tsp salt
2 tsp sugar
sachet yeast
1 cup warm water
1 cup green olives pitted and chopped
2 tbslp chopped fresh oregano leaves or whatever herbs you have in the cupboard.
Olive oil
A drizzle of milk

Mix flour, salt, sugar, and yeast in a large mixing bowl and add the water.
Knead until it's a smooth ball, be sure to collect the dough off the side of the bowl. You can do this on a flour surface or in the bowl, which is what I do to contain the mess.
Cover dough in olive oil put it back in the bowl, and leave to rise in covered in a warm place for 1 hour or until it has doubled in size.

Lining the loaf pan.
Grease a loaf pan with olive oil and dust with flour, or line it with baking paper or both.

I grease, dust then line the pan so that I have paper overhanging on the long ends. That way when it's baked I'm only detaching the short sides and lifting the rest out fairly easily.
In an deal world it should leave the sides of the pan when it's baked, but lets be realistic. When has anyone ever baked something that has just fallen out of the pan perfectly without needing to fiddle with a knife? This never happens to me so I use baking paper to minimise the fiddle.


After 1 hour punch the dough and add your olives and herbs. Kneed until mixed thoroughly. Place in your greased loaf pan. Brush some milk over the top. In my case, pour it over!
Cover once again and leave to rise for another hour.

Preheat your oven to 190C or 180C fan forced. 
Baked bread with a gold tinge.

Remove cover from the loaf and and place in the oven for 35-40 minutes. But keep an eye, every oven is different.
The bread is ready if you have a brown to gold tinge on top and it sounds hollow when you tap the bread in the middle.

Leave it to cool in the pan, then carefully turn it out onto a plate or chopping board. Cut thick slices and serve fresh or toasted with butter or your favourite cheese.


Wednesday 27 July 2011

Wonderful world of mince continued...

Tonight I already have the main part of my chilli con carne ready to go. Not much pressure now! I can sit down, have a cup of tea, call my mother, call my sister etc, etc. I have saved myself at least an hour when you consider the time it takes to gather ingredients, chop, cook, and wash up.
Since I have a bit of time on my hands I'm going to whip up a little extra something to make dinner a bit more fun than just rice and a one pot wonder.

So I'm making an olive bread, and guacamole to go with.

Olive and Rosemary Bread
1/2 tsp sugar (White, raw, brown, caster, whatever's in the cupboard) I like raw, keeps it natural!
1/2 cup warm water
2 cups flour
1/2 sachet yeast
7-10 pitted green olives chopped coarsley
a small stick of rosemary leaves chopped coarsely (discard the stick!)


Preheat oven to a moderate-hot 220C.
Dissolve sugar into water and add yeast. Cover for 10 minutes or until frothy.
Sift your flour into a large bowl. Add olives and rosemary, and mix well. Pour in the yeast mix and a drizzle of olive oil. Knead in the bowl until smooth. Cover and set aside to rise.

While that's rising I'm going to make some guacamole but here's the rest of the recipe so to avoid confusion:

Roll out onto a flat oven tray lined with baking paper.

Now, before I go any further, I just wanted to say how handy flat trays are. No need roll out onto a floured bench space, then carefully transfer onto a tray, and deal with flour to clean up. You just roll your dough onto a flat tray and bung it in the oven! If you don't have one, it might be worth checking them out. 

I'll do anything to minimise mess. And as you can tell I hate it when flour goes everywhere. Containment is the key!

Anyway, back to the dough.

Drizzle with a bit of olive oil, then bake in the oven for 15 minutes or until golden brown.
Cut into wedges and serve!

Guacamole
1 Avocado
Juice of 1/4 of a lemon
1 tsp sweet chilli sauce

Peel avocado, discard the pip. Then put it all into a bowl, and mash it up with a fork, or use a processor. Your choice. I can't be bothered with the food processor bowl tonight so forks it is!
That's done in less than 5 minutes.


After I've done that my bread will have risen enough start getting it into the oven. (I've used my brother's philosophy here)

Next is the main part.

Chilli Con Carne continued...
This made enough for about 4 people
Basically, my chilli con carne is done. It's been steeping in the fridge taking in all the spices overnight, so the flavour will be at its best. All that's left to do is mix a few more ingredients in and warm it through.

To finish it off you will need the following:

1 tsp tomato paste
200g sweet potato chopped into 1 cm chunks
400g can of kidney beans

Pour stored chilli con carne sauce into a pan and heat on medium.
Add tomato paste and mix until combined with the sauce.
Then add sweet potato and kidney beans including the brine for a richer flavour.
Bring to the boil then simmer until potatoes are tender.


Meanwhile, get rice on the go. 

You know the drill: 1 cup rice : 2 cups boiling water for absorption method.
Bring in a pot bring water to the boil on high and add rice. Boil on high for 5 mins. Stir, then cover on low for 5 mins, turn off the heat and keep covered for 5 mins.


By then your bread should be ready, and your chilli con carne warmed through. 

Serve it up! You're a hero in half the time!

Sunday 24 July 2011

The wonderful world of mince

Even though we don't all run cafe's there's no reason why we can't organise our kitchens like one. 
In a professional kitchen preparation and efficiency is everything. It keeps costs down. This includes ingredients, labour, electricity etc.
You can relate this to your own home. Unless you're a die hard chef wannabe, or have plenty of time on your hands, why spend loads of time in the kitchen after being at work all day if you don't have to?
So for the next few days I'm going to go through something I did at the cafe to cut my time in half, or by a third for that matter.

Mince is probably one of the most versatile sorts of meat you can cook with.
So I'm going to talk about mince sauce of the tomato based variety. What this is about is saving time in the kitchen, and having something decent to eat at the end of the day.
If you've got the main part of your meal already prepped it takes the decision out of cooking, and saves you running off to the shop to pick up extra ingredients. Plus, it frees up your time so you can even make a little extra something special to go with dinner. Like a sauce, a bread, or even a dessert. 

You won't believe how much time and washing up you'll save, not to mention the emotional stress after a rough day at work!
I also do this beacause it's hard cooking for two without making a big amount of something, and you don't want to be eating the same thing every day. Plus, I'm not a fan of the freezer. A lot of people are so if you like you can make a double amount and freeze this one away. It thaws just fine.

So my mince sauce journey starts today.

It's Monday, the start of the week. It was always going to be a hard slog, so I'm going to make it count by doing the majority of my prep tonight. 
That's just me. I like to get the hard stuff out of the way in one hit. 
If this is too emotionally taxing for you, do it on Sunday, or Tuesday, or whatever day you feel you're emotionally up for it.

Mince Sauce
1/4 cup olive oil
1 bay leaf
500g beef mince
1 large onion finely chopped
4 cloves garlic
3 carrots peeled and chopped
400g can chopped tomatoes
200g tomato paste (a small jar)
1 tsp pepper
2 cubes of beef stock
1/2 tsp salt or to taste

In a deep fry pan or large saucepan heat the olive oil on high. Once hot drop the bay leaf in and fry until fragrant. Add the onion and cook until transparent.
Add beef mince, salt, and pepper and seperate with your spoon so you don't get big uneven chunks.


browned mince


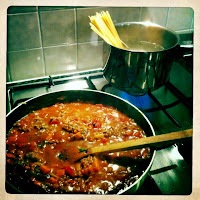
Cook until just brown, don't over cook it. It should look like the photo.
Then add and mix through carrot, can of tomatoes, tomato paste, and garlic. In a glass mix the stock cubes in with 250mL of boiled hot water, stir until dissolved, and add to the sauce. Bring to the boil and then simmer on low for 10 mins.

There, you have mince sauce.


Take it off the heat and store 1/2 in an airtight container. 
I like glass bowls with airtight lids because they dont stain like plastic.
Spaghetti bologniase for two
a small handful of freshly chopped or dried oregano leaves
1/4 cup red wine
1/4 tsp sugar (only add this if you don't like things too tomatoey)
200g pasta

Put the pan with remaining sauce back on the stove, and add oregano leaves, red wine, and sugar. Then get your pasta going for the bologniase.
Bring a medium pot half full of water to the boil, add pasta and cook for 8 mins or until pasta is al dante (just cooked, still a bit chewy)

While that's cooking, you're going to make some steamed vegies for tonight because you can't just load up on meat and carbo's. And there needs to be variety on the table. 
So throw some in a bowl with a bit of water, cover and heat on high for about 3 minutes.

Also, you're going to prep your next dinner.
You've got 8 minutes, you're in the kitchen anyway. Move it!

Chilli con carne prep
In the container full of left over sauce add:

1tsp ground coriander
1tsp ground cummin
1 tsp tumeric
1 tsp sweet, hot or smoked paprika
1/4 tsp dried chilli flakes (double if you like it spicy)

Stir it up, leave to cool, then refrigerate.

By then your vegies will be done, and your pasta cooked.
Strain the pasta and mix in the pan with your sauce to get some flavours through.
Serve with parmesan or tasty cheese (whatever's in the fridge), and your steamed vegies.
 
Dinner date no. 1 finished!

Tuesday 19 July 2011

Something guilt free after dinner

The other night I had a friend over for dinner who was watching her sugar intake. I had some dates and almonds in the cupboard so I made some biscuits for after dinner. Biscuits are nice and social, and not as much commitment as a cake or bowl of icecream. It means the conversation can continue around the couch with a cuppa in one hand and a biccie in the other. 
Easy, social and sweet!
I love dates and almonds when it comes to something low sugar. They're full of fibre, b-complex vitamins, and iron just to name a few things. You also get a rich texture and flavour without too much compromise, especially when you throw some spices into the mix. 

This is so quick, you can put it together in about 10 minutes if you don't count the 10 minutes it spends in the fridge firming up.


Date and Almond Biscuits
makes 12

1 1/2 cups plain flour*
1tsp baking powder
1/2 tsp ground cinnamon
1/4 tsp ground cardamon
3 level tblsp brown sugar
8 pitted dates rinsed and chopped
8 almonds coarsely chopped
1/4 cup grapeseed oil**
1/2 cup milk


Preheat oven to 160C and line a baking tray with baking paper.
Sift dry ingredients together into a large mixing bowl.
Add grapeseed oil and slowly add the milk. Knead the dough in the bowl until it becomes a nice firm ball.*** Add a splash of milk if it's still too dry.
Shape into a cylinder, wrap with baking paper, and refrigerate for about 10 mins.  Remove from the fridge and cut the dough into 12 biscuits. Bake on the lined tray for about 15 mins or until slightly golden.

Remove from the oven and leave to cool. Serve with a cup of tea or coffee.

There you have it. A low sugar dessert. You'll be enjoying the biccies and talking so much you wont even notice you've missed out on cheesecake and icecream!


* For extra fibre use wholegrain four

** I used grapeseed oil as it is natural and doesn't flavour the biscuits like olive oil. That's what I had in the cupboard but any vegetable oil will do, or you could just use butter.

*** This might sound lazy but it beats the hell out of flouring your bench and getting it all over the floor and your nice clothes. It's the last thing you want when someone's about to knock on your door. Contain the mess by using a bowl which is large enough to get your hands in to knead the dough. You'll save on flour and carbo's. 

**** You can make this dough and store it in the freezer. Just wrap it in baking paper, cover in foil and freeze. When you want to bake the biscuits just let it thaw until the dough feels slightly soft when pressed, cut and bake in a preheated 160C oven.

***** for extra colour throw a small handful of coarsely chopped pistachios into the mix

Friday 15 July 2011

Adding to the larder

Since I've made some natural yoghurt I thought it would be a good idea to make some Lubneh for some variety. There are two types, the one that is like a dip, and the one that is a much thicker, cheesy texture and rolled into balls.
I'm making the balls today. 

Lubneh balls
Lubneh

500g natural yoghurt
dried oregano leaves or italian mixed herbs
ground chilli to taste
salt to taste
sunflower oil

Put the natural yoghurt in a muslin cloth, or a pillow case.
Twist the case until the yoghurt is squeezed into the bottom of the case and tie it somewhere so the water drains away.
I tie it around the spout and let it hang in the kitchen sink. That way there’s no mess.

If you want the lubneh that is more like a dip, let the water strain for about an hour, if you want to make the labna balls let it hang for a few hours to get rid of more water. This will make it easier to roll into balls.

So once the water has been strained mix the chilli and salt and a little bit of herbs through. Roll them into bite size balls.

Then roll them through herbs and a bit more chilli until they are well covered. Place them in a jar and cover in oil. Store in the fridge.

Traditionally served at breakfast with lebanese bread. Drizzle some of the oil from the jar on top, it tastes great once the flavours have had some time to develop.
It's also beautiful crumbled into a salad. Enjoy!